MyBatis
1. MyBatis Framework
- JDBC만 이용해 데이터베이스를 쓴다면...? 복잡하고 실수하기 쉽다.. ㅠㅡㅠ
public void executeInsert(Student student) {
    String sql = "INSERT INTO student (name, age, phone, email) VALUES (?, ?, ?, ?)";
    try (Connection connection = dataSource.getConnection();
         PreparedStatement statement = connection.prepareStatement(sql)){

        statement.setString(1, student.getName());
        statement.setInt(2, student.getAge());
        statement.setString(3, student.getPhone());
        statement.setString(4, student.getEmail());

        statement.executeUpdate();
    } catch (SQLException e) {
        log.error(e.getMessage(), e);
    }
}
MyBatis Framework
: JDBC를 이용하지만, JDBC를 활용하기 위해 필요한 많은 과정을 추상화하여 복잡함을 줄임.
- Java interface의 메서드에 개발자가 정해둔 SQL문을 매핑하여 사용하도록 만들어짐.
- 인자와 결과를 Java 객체로서 활용가능.
MyBatis 시작하기
1) 프로젝트 의존성 추가하기
//build.gradle 설정 추가
dependencies {
	implementation 'org.mybatis.spring.boot:mybatis-spring-boot-starter:3.0.3'
}
2) 스프링부트 데이터베이스 설정하기 : application.yml / application.properties
- url : 데이터베이스에 접속하기 위한 URL
- driver-class-name : 데이터베이스를 사용할 때 사용할 JDBC 드라이버. (사용하는 RDBMS에 따라 다름)
- username/ password : 데이터베이스의 접속 정보를 작성하는 곳
//application.yml
spring:
  datasource:
    url: jdbc:sqlite:db.sqlite
    driver-class-name: org.sqlite.JDBC
#   username: sa
#   password: password


//application.properties
spring.datasource.url=jdbc:sqlite:db.sqlite
spring.datasource.driver-class-name=org.sqlite.JDBC
3) MyBatis 관련 설정하기 : application.yml / application.properties
//application.yml
mybatis:
  mapper-locations: "classpath:mybatis/mappers/*.xml"
  type-aliases-package: "com.example.crud.model"
  configuration:
    map-underscore-to-camel-case: true

//application.properties
mybatis.mapper-locations=classpath:mybatis/mappers/*.xml
mybatis.type-aliases-package=com.example.mybatis.model
mybatis.configuration.map-underscore-to-camel-case=true
** properties VS yaml
: 둘다 java 프로젝트에서 설정하는데 사용.
- properties : 단순 키=값 형태로 정리된 설정
- yaml : 설정이 계층 구조로 이뤄져 가독성이 뛰어남.

2. Annotation으로 SQL 작성
1) StudentMapper interface 생성/ @Mapper 애너테이션 추가
@Mapper
public interface StudentMapper {

}
2) Select 메서드 만들어보기
@Mapper
public interface StudentMapper {
    //Mybatis는 인터페이스의 메서드에 SQL을 연결시킨다.
    // 마이바티스의 세션을 이용해서 인터페이스의 메서드를 실행하면
    // 연결된 SQL이 실행된다.
    @Select("SELECT * FROM students;")
    List<StudentDto> selectStudentAll();
}
3) Dao 객체 만들기
//Data Access Object
// 데이터 통신을 담당하는 클래스임을 스프링에 알려줌.
public class StudentDao {
    // Mybatis와 데이터베이스를 연결해주는 객체
    private final SqlSessionFactory sessionFactory;

    // Spring Boot안에 만들어진 SqlSessionFactory Bean이 자동으로 주입된다.
    public StudentDao(SqlSessionFactory sessionFactory) {
        this.sessionFactory = sessionFactory;
    }
}
4) SELECT ALL
: 데이터베이스에서 학생 데이터를 불러오는 메서드 만들어보기
- SqlSession : DataBase와 MyBatis가 연결되었다는 것을 상징하는 객체. Mapper interface 제
//StudentDao class

    // 데이터베이스에서 학생 데이터를 전부 불러오는 메서드
    public List<StudentDto> readStudentsAll(){
        // SqlSession은 MyBatis와 데이터베이스가 연결되었다는 것을 상징하는 객체
        try (SqlSession session = sessionFactory.openSession()) {
            // Mapper 인터페이스를 가져온다. (그 안의 메서드를 실행가능)
            StudentMapper mapper = session.getMapper(StudentMapper.class);
            return mapper.selectStudentAll();
        }
    }
>> 이렇게 하면 마이바티스로 연결하여 학생 정보 전체 선택 조회 가능...
5) INSERT : 학생 데이터 넣기
- StudentMapper 메서드 생성 >> 인자 전달은 #{param}으로 전달하여 SQL의 해당 부분을 대치한다.
// StudentMapper interface
    @Insert("INSERT INTO students (name, email) " +
            "VALUES(#{name}, #{email})")
    void insertStudent(StudentDto dto);
- StudentDao에서 메서드 생성 : StudentDto를 받아 학생을 데이터베이스에 추가하는 메서드
// StudentDao class
    public void insertStudent(StudentDto dto) {
        try (SqlSession session = sessionFactory.openSession()) {
            StudentMapper mapper = session.getMapper(StudentMapper.class);
            mapper.insertStudent(dto);
        }
    }
- service에서 메서드 생성
//StudentService class
	public void createStudent(String name, String email) {
        StudentDto dto = new StudentDto();
        dto.setName(name);
        dto.setEmail(email);
        dao.insertStudent(dto);
    }
6) SELECT ONE : 학생 객체 한명 반환
- StudentMapper 메서드 생성 >> 인자 전달은 #{param}으로 전달하여 SQL의 해당 부분을 대치한다.
// StudentMapper interface
    @Select("SELECT * FROM student " +
            "where id = #{id};")
    StudentDto selectStudentOne(Long id);
- StudentDao에서 메서드 생성 : StudentDto를 받아 학생을 데이터베이스에 추가하는 메서드
// StudentDao class
    // id를 Long으로 받아 데이터베이스에서 id가 같은 줄을 반환하는 메서드
    public StudentDto readStudentOne(Long id) {
        try (SqlSession session = sessionFactory.openSession()) {
            StudentMapper mapper = session.getMapper(StudentMapper.class);
            return mapper.selectStudentOne(id);
        }
    }
- service에서 메서드 생성
//StudentService class
	public StudentDto readStudentOne(Long id) {
        return dao.readStudentOne(id);
    }
7) UPDATE : 학생 객체 수정
- StudentMapper 메서드 생성 >> 인자 전달은 #{param}으로 전달하여 SQL의 해당 부분을 대치한다.
// StudentMapper interface
    @Update("UPDATE student SET " +
            "name=#{name}, " +
            "email=#{email} " +
            "where id=#{id}")
    void updateStudent(StudentDto dto);
- StudentDao에서 메서드 생성 : StudentDto를 받아 학생을 데이터베이스에 추가하는 메서드
// StudentDao class
    public void updateStudent(StudentDto dto) {
        try (SqlSession session = sessionFactory.openSession()) {
            StudentMapper mapper = session.getMapper(StudentMapper.class);
            mapper.updateStudent(dto);
        }
    }
- service에서 메서드 생성
//StudentService class
	public StudentDto updateStudent(Long id, String name, String email) {
        StudentDto dto = this.readStudentOne(id);
        dto.setName(name);
        dto.setEmail(email);
        dao.updateStudent(dto);
        return dto;
    }
8) DELETE : 학생 객체 삭제
- StudentMapper 메서드 생성 >> 인자 전달은 #{param}으로 전달하여 SQL의 해당 부분을 대치한다.
// StudentMapper interface
    @Delete("DELETE FROM student " +
            "WHERE id=#{id}")
    void deleteStudent(Long id);
- StudentDao에서 메서드 생성 : StudentDto를 받아 학생을 데이터베이스에 추가하는 메서드
// StudentDao class
    public void deleteStudent(Long id) {
        try (SqlSession session = sessionFactory.openSession()) {
            StudentMapper mapper = session.getMapper(StudentMapper.class);
            mapper.deleteStudent(id);
        }
    }
- service에서 메서드 생성
//StudentService class
    public void deleteStudent(Long id) {
        StudentDto dto = this.readStudentOne(id);
        dao.deleteStudent(id);
    }
3. XML로 SQL 작성
1) XML과 interface 연결
- interface 정의
public interface StudentXmlMapper {}
- xml 파일 필수 설정
//resources > StudentMapper.xml

<?xml version="1.0" encoding="UTF-9" ?>
<!DOCTYPE mapper PUBLIC "-//mybatis.org//DTD Mapper 3.0//EN"
	"http://mybatis.org/dtd/mybatis-3-mapper.dtd">
- XML mapper 설정
- namespace : 어떤 interface와 연결할 xml인지를 지정
- id : 연결하고자 하는 인터페이스의 메서드 이름
- resultType : SQL 결과를 담기위한 자료형(클래스)
- parameterType : SQL에 전달할 인자 타입 (일반적인 자바 클래스를 사용할 수 있다.)
<mapper namespace="com.example.crud.mapper.StudentXmlMapper">
<!--실행하고 싶은 SQL을 넣어줄 수 있다. -->
    <select id="selectStudentAll" resultType="com.example.crud.model.StudentDto">
        select * from student;
    </select>
</mapper>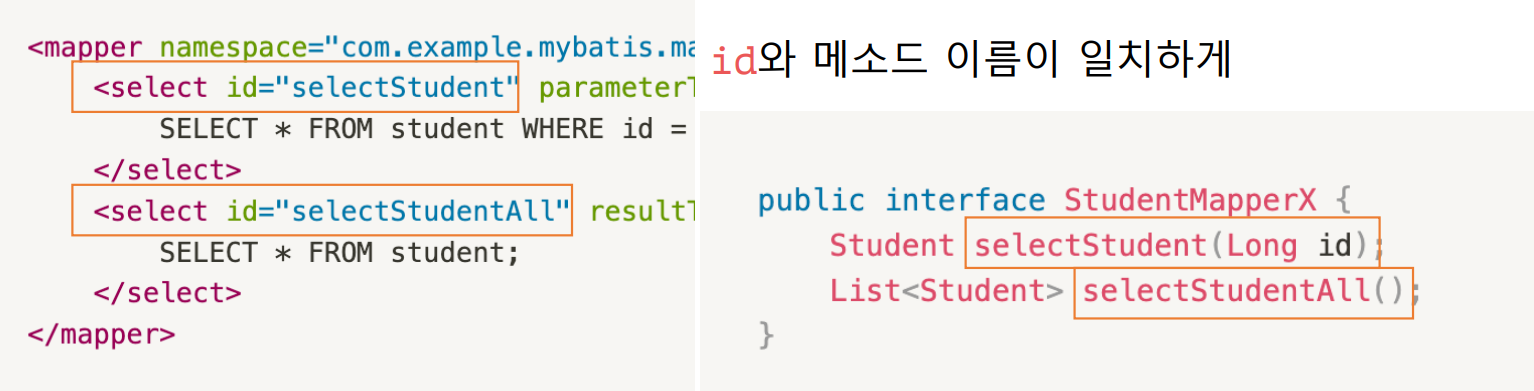
- repository에서의 사용방법은 annotation과 동일하다.
@RequiredArgsConstructor
@Repository
public class StudentXmlDao {
    private final SqlSessionFactory sessionFactory;

    public List<StudentDto> readStudentAll() {
        //사용방식은 annotation 기반과 동일하다.
        try (SqlSession session = sessionFactory.openSession()) {
            StudentXmlMapper mapper = session.getMapper(StudentXmlMapper.class);
            return mapper.selectStudentAll();
        }
    }
}
--> xml 활용한 방법은 좀더 복잡한 sql문 사용 가능하여 복잡한 쿼리가 필요한 프로젝트에서 많이 사용한다.
쿼리를 그 자체로 활용할 수 있다는 장점이 있다~
(annotation 활용한 방법은 간단한 쿼리문만으로도 가능할 때 주로 사용.)
전체 코드 **
- StudentMapper.xml
<?xml version="1.0" encoding="UTF-8" ?>
<!DOCTYPE mapper PUBLIC "-//mybatis.org//DTD Mapper 3.0//EN"
        "http://mybatis.org/dtd/mybatis-3-mapper.dtd">

<mapper namespace="com.example.crud.mapper.StudentXmlMapper">
    <select id="selectStudentAll" resultType="StudentDto">
        select * from student;
    </select>

    <select id="readStudentOne" resultType="StudentDto"
            parameterType="Long">
        select *
        from student
        where id = #{id};
    </select>

    <insert id="insertStudent" parameterType="StudentDto">
        insert into student (name, email)
        VALUES (#{name}, #{email});
    </insert>

    <update id="updateStudent" parameterType="StudentDto">
        update student
        set name = #{name},
            email=#{email}
        where id = #{id};
    </update>

    <delete id="deleteStudent" parameterType="Long">
        delete
        from student
        where id = #{id};
    </delete>
</mapper>
- StudentXmlMapper.java
import com.example.crud.model.StudentDto;

import java.util.List;

public interface StudentXmlMapper {
    List<StudentDto> selectStudentAll();
    void insertStudent(StudentDto dto);
    StudentDto readStudentOne(Long id);
    void updateStudent(StudentDto dto);
    void deleteStudent(Long id);
}
- StudentXmlDao.java
import com.example.crud.mapper.StudentMapper;
import com.example.crud.mapper.StudentXmlMapper;
import com.example.crud.model.StudentDto;
import lombok.RequiredArgsConstructor;
import org.apache.ibatis.session.SqlSession;
import org.apache.ibatis.session.SqlSessionFactory;
import org.springframework.stereotype.Repository;

import java.util.List;

//bean 객체 등록
@RequiredArgsConstructor
@Repository
public class StudentXmlDao {
    private final SqlSessionFactory sessionFactory;

    public List<StudentDto> readStudentAll() {
        //사용방식은 annotation 기반과 동일하다.
        try (SqlSession session = sessionFactory.openSession()) {
            StudentXmlMapper mapper = session.getMapper(StudentXmlMapper.class);
            return mapper.selectStudentAll();
        }
    }

    public void insertStudent(StudentDto dto) {
        try (SqlSession session = sessionFactory.openSession()) {
            StudentXmlMapper mapper = session.getMapper(StudentXmlMapper.class);
            mapper.insertStudent(dto);
        }
    }

    public StudentDto readStudentOne(Long id) {
        try (SqlSession session = sessionFactory.openSession()) {
            StudentXmlMapper mapper = session.getMapper(StudentXmlMapper.class);
            return mapper.readStudentOne(id);
        }
    }

    public void updateStudent(StudentDto dto) {
        try (SqlSession session = sessionFactory.openSession()) {
            StudentXmlMapper mapper = session.getMapper(StudentXmlMapper.class);
            mapper.updateStudent(dto);
        }
    }

    public void deleteStudent(Long id) {
        try (SqlSession session = sessionFactory.openSession()) {
            StudentXmlMapper mapper = session.getMapper(StudentXmlMapper.class);
            mapper.deleteStudent(id);
        }
    }
}
- StudentService.java
import com.example.crud.model.StudentDto;
import lombok.RequiredArgsConstructor;
import org.springframework.stereotype.Service;

import java.util.List;

@Service
@RequiredArgsConstructor
public class StudentService {

    private final StudentXmlDao xmlDao;

    public void createStudent(String name, String email) {
        StudentDto dto = new StudentDto();
        dto.setName(name);
        dto.setEmail(email);
        xmlDao.insertStudent(dto);
    }

    //현재 등록된 모든 학생을 반환한다.
    public List<StudentDto> readStudentAll() {
        return xmlDao.readStudentAll();
    }

    //id를 받아서 하나의 학생 데이터를 반환한다.
    public StudentDto readStudentOne(Long id) {
        return xmlDao.readStudentOne(id);
    }

    public StudentDto updateStudent(Long id, String name, String email) {
        StudentDto dto = this.readStudentOne(id);
        dto.setName(name);
        dto.setEmail(email);
        xmlDao.updateStudent(dto);
        return dto;
    }

    //id를 바탕으로 학생을 제거하는 메서드
    public void deleteStudent(Long id) {
        StudentDto dto = this.readStudentOne(id);
        xmlDao.deleteStudent(id);
    }
}'Programming > Spring, SpringBoot' 카테고리의 다른 글
| Spring Beans (0) | 2024.01.15 |
|---|---|
| Spring Data JPA (Java Persistence API) (2) | 2024.01.07 |
| Post/Redirect/Get : redirect를 사용해야하는 이유 (0) | 2024.01.04 |
| Spring MVC & Thymeleaf (4) | 2024.01.03 |
| 스프링부트 기초 (0) | 2024.01.03 |