쇼핑몰 프로젝트 고민거리들 및 오류 해결 과정
1. UserDetailsManager와 UserEntity
- UserDetailsManager의 구현체인 CustomUserDetailsManager를 만들어주었고, 여기서 UserEntityRepository와의 연결점이 되었다.
고민은 UserDetails의 구현체인 CustomUserDetails 자체를 UserEntity 취급을 하여야 할 것인지, CustomUserDetails는 UserEntity와는 다른 것으로 취급해야할지 잘 모르겠다.
일단 내가 구현한 방식은 CustomUserDetails, CustomUserDetails는 Spring Security에서 제공되는 부분이므로 이는 유저의 인증과 관련한 부분을 다루어야 하고, UserEntity는 인증보다는 실제 DB에 저장되는 유저 테이블에 대한 것들을 다루어야 한다고 생각하여 그렇게 나누어 구현했다.
- 요렇게 두가지로 서비스를 나누어 구현해보았다.

2. 관리자 계정 생성
관리자 계정은 애플리케이션 생성시 자동으로 입력되어 이후 회원가입 방식으로는 관리자 계정을 만들 수 없도록 구현했다. 관리자 SQL문을 data.sql로 넣어서 구현하려고 하였다.
이때 data.sql문을 내장 데이터베이스가 아닌 외부 데이터베이스와 연결하기 위해서는 yaml에서 script 파일을 실행하도록 설정을 적용해야 한다.
- spring.sql.init.mode: always
hibernate.ddl-auto 옵션과 함께 data.sql 스크립트를 사용할 때에 필요한 옵션이 또 존재한다.
- spring.jpa.defer-datasource-initialization: true
이 설정을 활용하면 ddl-auto 옵션에 대한 설정이 먼저 실행되고, 이후 script가 실행되어 data.sql이 적용되게 된다.
spring:
  sql:
    init:
      mode: always
  jpa:
    hibernate:
      ddl-auto: create
    defer-datasource-initialization: true
그러나, 나는 처음에 되던 sql script가 프로젝트 중간에 갑자기 실행이 되지 않았다...


결국 세팅을 조금 바꿔서 import.sql로 hibernate 내에서 스크립트가 실행되도록 변경했더니 되긴 됐다.
spring:
  sql:
    init:
      data-locations: classpath:import.sql
      mode: always
  jpa:
    hibernate:
      ddl-auto: create
    defer-datasource-initialization: true
    show-sql: true
참고로, 관리자 sql을 넣으면 로그인시 비밀번호가 복호화되면서 일치를 확인하기 때문에, 이를 암호화된 채로 넣어주어야 한다. 그래서 나는 Bcrypt로 암호화한 비밀번호를 넣어주었다.
// import.sql
# 초기 admin 계정 생성
INSERT INTO user_entity (account_id, password, authority)
VALUES ('admin', '$2a$10$hithVJ9E/VPOzKwGfn9kQu9c0QcBfAWnaFNFWh0gohj03Ij05pm9.', 'ROLE_ADMIN');
** 이것과 관련해서는 다시 확인해봐야할 것 같다. 근본적인 해결책이 아닌 느낌이다.
3. 인증과 토큰
사용자 인증 처리를 했는데, USER_ROLE에 따라서 필터링은 되는데, 해당 로그인 아이디 주인이라는 것을 인증하고나서 해당 기능에 대한 접근이 제한되어야 하는데, 안되고 있다.
ex) 나는 123인데, 234의 정보도 수정이 되는 문제. 즉, 계정 주인만이 정보수정이 가능한데, 다른 계정 주인도 정보수정에 대한 접근이 된다는 것.
=> 깨달음!
이를 위해 JWT 토큰을 활용하는 거구나! 요청마다 header에 JWT 토큰이 포함되어 있고, 어떤 기능에서는 인증에 더불어 해당 계정의 주인이라는 것을 알아야 한다. 그러므로 확인하는 과정을 해당 메서드에 구현해야 하는 것.
ex) 사업자 계정 전환 신청시 해당 로그인한 아이디와 신청하는 유저가 같은지 확인하는 과정. manager.checkIdIsEqual() 에서 확인 가능하다. 만약 일치하지 않을시에는 ResponseStatusException이 발생한다.
// UserService class
	// 사업자계정 전환 신청
    @Transactional
    public BAResponse registerBA (String accountId, BARequest dto) {
        UserEntity foundUser = optional.getFoundUser(accountId);
        // 로그인한 아이디와 이 유저가 같은지 확인
        manager.checkIdIsEqual(foundUser.getAccountId());

        // 등록요청 update
        foundUser.setBusinessNumber(dto.getBusinessNumber());
        foundUser.setBusinessIsAllowed(false);
        foundUser = userRepository.save(foundUser);

        return BAResponse.fromEntity(foundUser);
    }

// CustomUserDetailsManager class
    // 로그인한 아이디와 해당 아이디가 같은지 확인하는 메서드
    public void checkIdIsEqual(String accountId) {
        String loginId = facade.getAuth().getName(); //현재 인증정보의 id name
        // 다르면 예외처리
        if (!accountId.equals(loginId)) {
            throw new ResponseStatusException(HttpStatus.FORBIDDEN);
        }
        // 같으면 계속 이어서 감
    }
상세 코드
//들어온 요청에 대해 토큰 유효성 확인 &이에 따른 인증정보를 등록해주는 필터
@Slf4j
@RequiredArgsConstructor
public class JwtTokenFilter extends OncePerRequestFilter {
    private final JwtTokenUtils jwtTokenUtils;
    private final UserDetailsManager manager;

    @Override
    protected void doFilterInternal(
            HttpServletRequest request,
            HttpServletResponse response,
            FilterChain filterChain
    ) throws ServletException, IOException {
        // 1. authorization 헤더를 회수
        String authHeader = request.getHeader(HttpHeaders.AUTHORIZATION);

        // 2. 헤더가 존재하는지, Bearer로 시작하는지
        if (authHeader != null && authHeader.startsWith("Bearer ")) {
            // 3. 존재하면 유효한 토큰인지 확인
            String token = authHeader.split(" ")[1];
            //토큰 확인
            if (jwtTokenUtils.validate(token)) {
                // contextHolder에서 context를 만들고,
                SecurityContext context = SecurityContextHolder.createEmptyContext();
                // 토큰에서 사용자 정보 가져오기
                String username = jwtTokenUtils.parseClaims(token).getSubject();
                log.info("username:: "+username);

                UserDetails userDetails = manager.loadUserByUsername(username);
                //인증 정보 생성
                AbstractAuthenticationToken authenticationToken = new UsernamePasswordAuthenticationToken(
                        userDetails, token, userDetails.getAuthorities()
                );
                //인증 정보 등록
                context.setAuthentication(authenticationToken);
                SecurityContextHolder.setContext(context);
                log.info("===set security context with jwt");
            } else {
                log.warn("jwt validation failed!");
            }
        }
        filterChain.doFilter(request, response);
    }
}
이렇게 토큰을 확인하고, 인증정보를 생성해서 SecurityContextHolder에다가 저장해두었으니,
이제 로그인한 사용자가 요청을 보낼때마다 이 필터가 적용되면서 SecurityContext에 저장된 것을 활용할 수가 있다.
더불어 인증 관련한 내용이기 때문에 CustomUserDetailsManager에서 처리를 해주었다.
// CustomUserDetailsManager

    // 로그인한 아이디와 해당 아이디가 같은지 확인하는 메서드
    public void checkIdIsEqual(String accountId) {
        String loginId = facade.getAuth().getName(); //현재 인증정보의 id name
        // 다르면 예외처리
        if (!accountId.equals(loginId)) {
            throw new ResponseStatusException(HttpStatus.FORBIDDEN);
        }
        // 같으면 계속 이어서 감
    }

// Facade

@Component
public class AuthenticationFacade {
    public Authentication getAuth() {
        return SecurityContextHolder.getContext().getAuthentication();
    }
}
이후
// UsedGoodsService

    // 중고거래 등록 물품 수정
    public UsedGoodsDto updateUsedGoods(Long id, UsedGoodsDto dto) {
        Optional<UsedGoods> usedGoods = usedGoodsRepo.findById(id);
        if (usedGoods.isEmpty()) {
            throw new ResponseStatusException(HttpStatus.NOT_FOUND);
        }
        UsedGoods foundGoods = usedGoods.get();

        // 로그인한 아이디와 물품 등록 판매자가 다르면 unauthorized
        String sellerId = foundGoods.getSeller().getAccountId();
        manager.checkIdIsEqual(sellerId);

        foundGoods.setTitle(dto.getTitle());
        foundGoods.setDescription(dto.getDescription());
        foundGoods.setMinimumPrice(dto.getMinimumPrice());
        foundGoods.setImageUrl(dto.getImageUrl());

        return UsedGoodsDto.fromEntity(foundGoods);
    }
이런식으로 로그인 사용자와 해당글에 대한 권한이 있는 사용자가 일치하는지 확인하는 과정을 쉽게 끌어왔다.
4. 클래스캐스팅 오류

    @Override
    public CustomUserDetails loadUserByUsername(String userId) throws UsernameNotFoundException {
        //repo에서 userId로 찾아오기
        Optional<UserEntity> optionalUser = userRepository.findByAccountId(userId);
        if (optionalUser.isEmpty()) {
            log.info("loadUserByUsername : not found");
            throw new ResponseStatusException(HttpStatus.NOT_FOUND);
        }

        UserEntity userEntity = optionalUser.get();
        //리턴을 UserDetails 형태로 한다
        CustomUserDetails userDetails = (CustomUserDetails) User.withUsername(userEntity.getAccountId())
                .password(userEntity.getPassword())
                .authorities(userEntity.getAuthority())
                .build();
        return userDetails;
    }
처음에는 이렇게 시도를 했다. 무조건 User.withUsername()....build()이렇게 유저를 빌드해야하는줄 알았다.
그러나, 이렇게 User로 생성하여 CustomUserDetails로 클래스 캐스팅이 불가했다.
왜냐하면 User클래스는 Spring Security에서 UserDetails를 구현해놓은 구현체 중 하나고, 이를 활용해 편하게 빌더로 객체 생성가능하게 해놓은 것이다. 즉, User, CustomUserDetails 둘 다 구현체이기 때문에 클래스캐스팅이 불가하다.
나는 CustomUserDetails를 만들어두었으니, 이로 리턴하기 위해서는 그냥 CustomUserDetails 빌더패턴으로 객체를 생성하면 된다.
=> 해결!
    @Override
    public CustomUserDetails loadUserByUsername(String userId) throws UsernameNotFoundException {
        //repo에서 userId로 찾아오기
        Optional<UserEntity> optionalUser = userRepository.findByAccountId(userId);
        if (optionalUser.isEmpty()) {
            log.info("loadUserByUsername : not found");
            throw new ResponseStatusException(HttpStatus.NOT_FOUND);
        }

        UserEntity userEntity = optionalUser.get();
        //리턴을 UserDetails 형태로 한다
        CustomUserDetails userDetails = CustomUserDetails.builder()
                .userId(userEntity.getAccountId())
                .password(userEntity.getPassword())
                .authorities(userEntity.getAuthority())
                .build();
        return userDetails;
    }
5. Stream API 사용과 조건 설정 : if else 문 + isEmpty
- 물품 구매 제안을 조회할 때 조건이 있었다.
1) 물품 등록한 사용자는 물품에 대한 제안을 모두 확인 가능하다.
2) 물품에 대해 제안을 등록한 사용자는 본인의 제안만 확인이 가능하다.
3) 등록자와 제안자가 아닌 사용자는 조회가 불가능하다.
이러한 세가지 조건을 표현하기가 어렵고 복잡했다. 또 이를 Stream API를 사용하여 표현해주고 싶었다.
1) 로그인 사용자가 해당 물품의 Seller인지 확인 => Seller이면 해당 물품에 대한 제안 모두 확인 가능
2) 로그인 사용자가 해당 물품의 Seller가 아니라면, => 해당 물품의 전체 제안에서 로그인 사용자가 Buyer인지 확인하고 리스트로 추출
3) 그 리스트가 비어있다면 해당 물품의 Seller도, Buyer도 아니기 때문에 -> 해당 물품의 제안에 대한 접근 권한이 없다.
비어있지 않다면 제안 등록한 사용자이기 때문에 해당 사용자의 제안만 확인 가능.
    // 물품 구매 제안 조회
    // 물품 등록한 사용자와 제안등록 사용자만 조회 가능
    public List<SuggestionResponse> readSuggestions(Long usedGoodsId) {
        UsedGoods foundGoods = optional.getUsedGoods(usedGoodsId);
        UserEntity loginUser = manager.loadUserFromAuth();

        // 물품등록자는 모든 제안 확인 가능
        if (loginUser.equals(foundGoods.getSeller())) {
            log.info("중고물품 등록자가 조회합니다");
            return suggestionRepo.findByUsedGoods(foundGoods).stream()
                    .map(SuggestionResponse::fromEntity)
//                    .peek(response -> log.info("SuggestionList:: " + response))
                    .collect(Collectors.toList());
        } // 제안등록자는 자신의 제안만 확인 가능
        else {
            List<Suggestion> suggestions = foundGoods.getSuggestionList()
                    .stream()
                    .filter(suggestion -> loginUser.equals(suggestion.getBuyer()))
                    .peek(suggestion -> log.info("중고물품 구매 제안자가 조회합니다."))
                    .collect(Collectors.toList());
            // 만약 자신의 제안이 없다면 suggestionList가 비어있을 것.
            if (suggestions.isEmpty()) {
                throw new ResponseStatusException(HttpStatus.FORBIDDEN, "제안조회 권한이 없습니다.");
            }
            return suggestions.stream()
                    .map(SuggestionResponse::fromEntity)
                    .peek(response -> log.info("SuggestionList:: "+response))
                    .collect(Collectors.toList());
        }
    }
6. Forbidden 에러
: 분명 ResponseException에 대한 다양한 설정을 해두었는데, 요청에 대한 에러가 무조건 403 Forbidden만 나타났다. 그래서 오류가 발생해도 어떤 이유인지 찾기가 너무 어려웠다. not found인지, bad request인지 등등 어떤 에러인지를 확인해야 쉽게 해당 문제를 해결할 수 있는데.
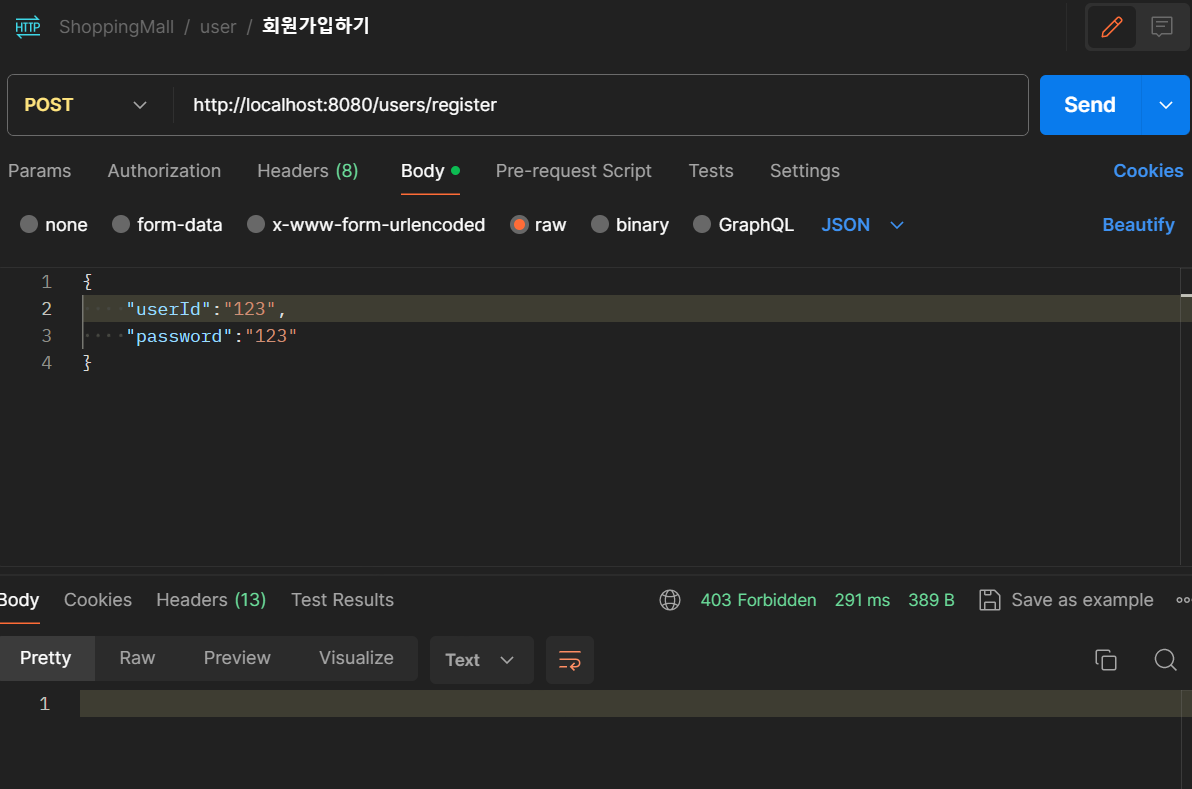
=> 알고보니 SecurityFilterChain에서 request에 대한 설정 때문이었다.
@Configuration
@RequiredArgsConstructor
public class WebSecurityConfig {
    private final JwtTokenUtils jwtTokenUtils;
    private final UserDetailsManager manager;

    @Bean
    public SecurityFilterChain securityFilterChain(
            HttpSecurity httpSecurity
    ) throws Exception {
        httpSecurity
                //csrf 보안 해제
                .csrf(AbstractHttpConfigurer::disable)
                .sessionManagement(session ->
                        session.sessionCreationPolicy(SessionCreationPolicy.STATELESS))
                .addFilterBefore(new JwtTokenFilter(jwtTokenUtils, manager), AuthorizationFilter.class)
                //url에 따른 요청 인가
                .authorizeHttpRequests(
                        auth -> //로그인, 회원가입은 익명사용자만 요청 가능
                                auth
                                        // 관리자 페이지는 관리자만 가능
                                        .requestMatchers("/admin/**")
                                        .hasAnyRole("ADMIN")
                                        // 로그인과 회원가입은 익명 사용자만 가능
                                        .requestMatchers("/users/login", "/users/register")
                                        .anonymous()
                                        // 추가정보 입력은 inactive만 가능
                                        .requestMatchers("/users/{accountId}/additional-info")
                                        .hasAnyRole("INACTIVE")
                                        // 중고거래, 비즈니스 계정 신청/확인, 쇼핑몰 서비스 이용 active, business만 가능
                                        .requestMatchers("/users/**", "/used-goods/**")
                                        .hasAnyRole("ACTIVE", "BUSINESS")
                                        // 쇼핑몰 운영 서비스는 business회원만 가능
                                        .requestMatchers("/shopping-malls/**")
                                        .hasAnyRole("ACTIVE", "BUSINESS", "ADMIN")
                                        .anyRequest().authenticated()
                )
        ;
        return httpSecurity.build();
    }
}
- 맨 마지막의 anyRequest().authenticated() 설정으로 인해 어떤 요청이든 인증이 되어야 한다는 설정이 되어있는데, 에러가 생겼을 때에는 /error로 요청이 가기 때문에 이때에도 인증 정보가 필요한 셈이다.

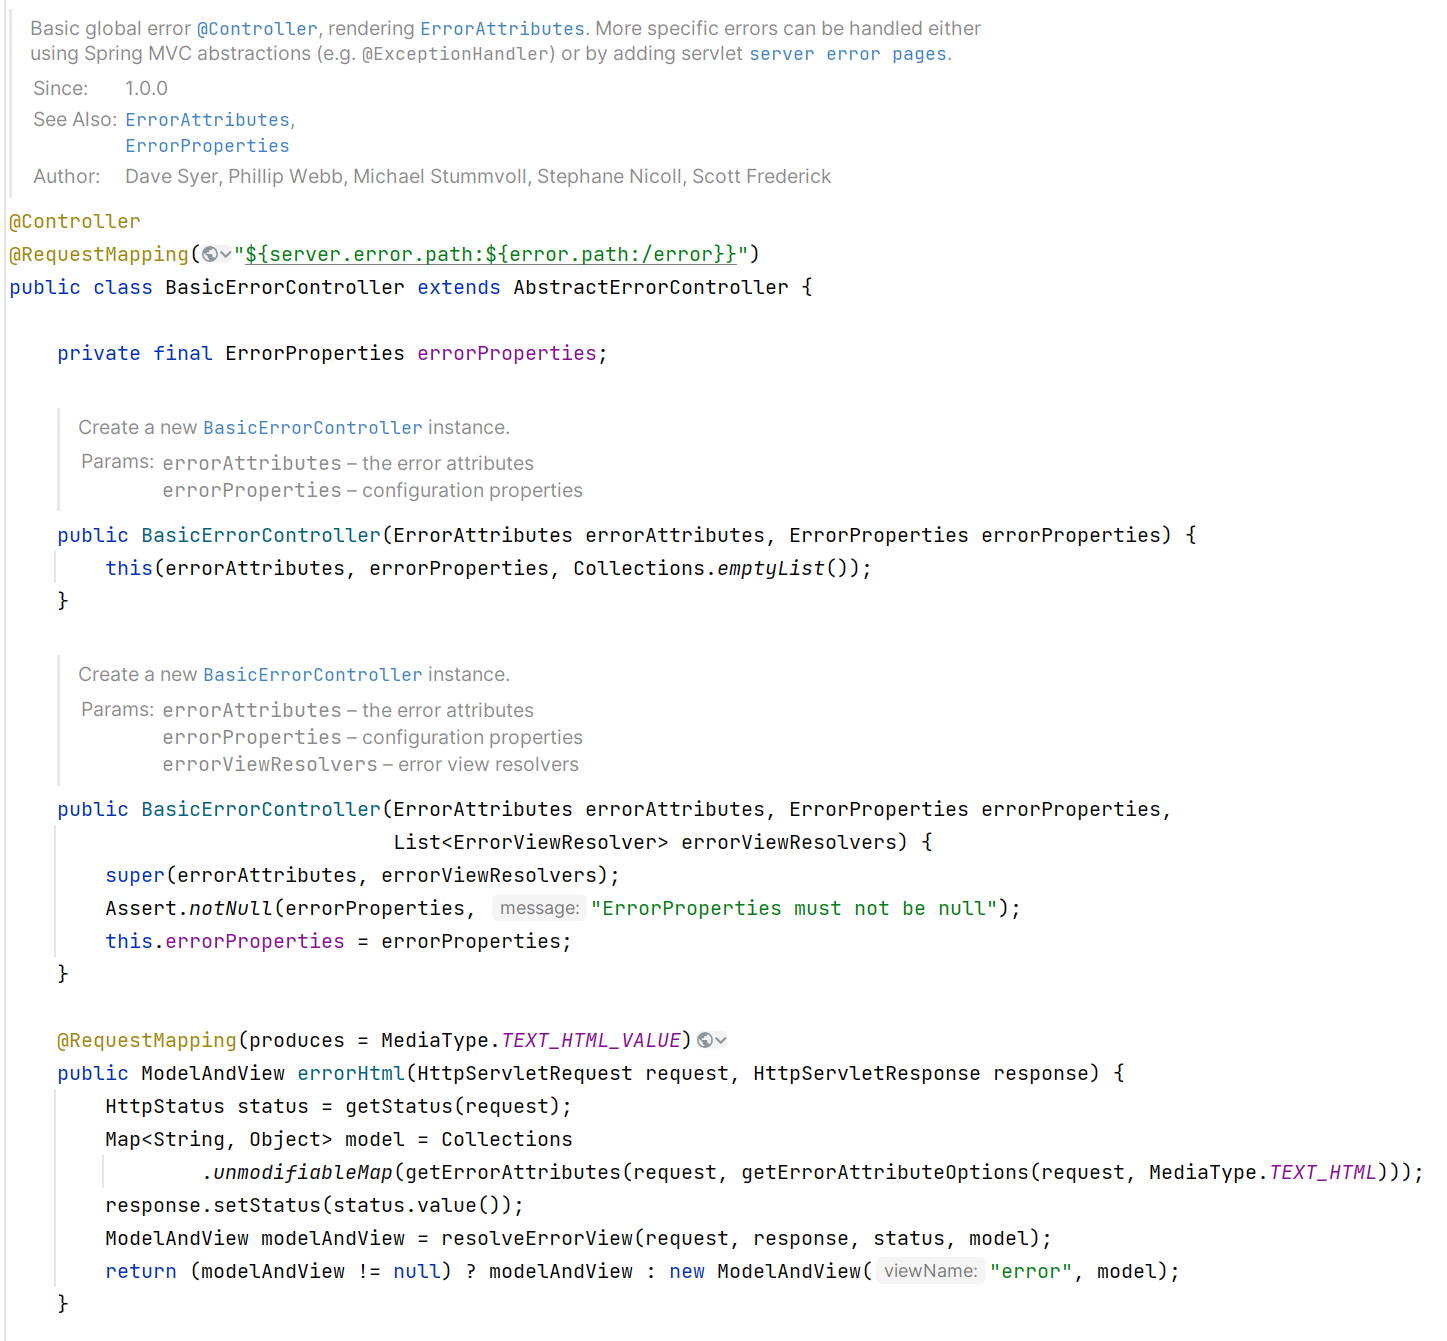
그러므로 에러 페이지에 대해서는 모든 사용자가 접근 가능하도록 바꾸었다.
> .requestMatcher("/error").permitAll()을 맨위에 추가해주었다.
@Configuration
@RequiredArgsConstructor
public class WebSecurityConfig {
    private final JwtTokenUtils jwtTokenUtils;
    private final UserDetailsManager manager;

    @Bean
    public SecurityFilterChain securityFilterChain(
            HttpSecurity httpSecurity
    ) throws Exception {
        httpSecurity
                //csrf 보안 해제
                .csrf(AbstractHttpConfigurer::disable)
                .sessionManagement(session ->
                        session.sessionCreationPolicy(SessionCreationPolicy.STATELESS))
                .addFilterBefore(new JwtTokenFilter(jwtTokenUtils, manager), AuthorizationFilter.class)
                //url에 따른 요청 인가
                .authorizeHttpRequests(
                        auth -> //로그인, 회원가입은 익명사용자만 요청 가능
                                auth
                                        .requestMatchers("/error").permitAll()
                                        // 관리자 페이지는 관리자만 가능
                                        .requestMatchers("/admin/**")
                                        .hasAnyRole("ADMIN")
                                        // 로그인과 회원가입은 익명 사용자만 가능
                                        .requestMatchers("/users/login", "/users/register")
                                        .anonymous()
                                        // 추가정보 입력은 inactive만 가능
                                        .requestMatchers("/users/{accountId}/additional-info")
                                        .hasAnyRole("INACTIVE")
                                        // 중고거래, 비즈니스 계정 신청/확인, 쇼핑몰 서비스 이용 active, business만 가능
                                        .requestMatchers("/users/**", "/used-goods/**")
                                        .hasAnyRole("ACTIVE", "BUSINESS")
                                        // 쇼핑몰 운영 서비스는 business회원만 가능
                                        .requestMatchers("/shopping-malls/**")
                                        .hasAnyRole("ACTIVE", "BUSINESS", "ADMIN")
                                        .anyRequest().authenticated()
                )
        ;
        return httpSecurity.build();
    }
}
그랬더니 정상적으로 오류 화면이 나왔다. 해결 완료!
7. AWS S3에 업로드 : 링크로 이동시 다운로드되는 문제
: 사진 업로드에 대한 구현을 진행중에 사진을 AWS S3 스토리지에 업로드하고, 업로드한 url을 데이터베이스에 저장하도록 구현했다.
이때 url로 이동하면 이러한 이상한 화면이 나왔다.


실제로 브라우저에 해당 url을 검색하면 이 때도 사진이 보이는 것이 아니라, 바로 다운로드가 되어버렸다.
확인해보니 업로드 시 Content-Type이 multipart/form-data로 설정이 되어버려 자동으로 다운로드 파일로 인식한다는 점이었다.
그래서 다시 Content-Type을 설정하지 않고 업로드했더니 자동으로 png 타입으로 설정이 되면서 해당 프로필 사진을 조회할 수 있었다.


8. 이미지 업로드 : 여러 장 업로드 구현에 대한 고민
: 이미지 업로드를 할 때 프로필사진은 한장만 업로드를 하여, 이를 다른 사진으로 교체할 때에는 원래 업로드되었던 사진파일을 S3에서 삭제 후 다시 올리기 기능을 만들 수 있었다. 어떻게든...
@Transactional
public String uploadProfileImage(String accountId, List<MultipartFile> multipartFile) {
    // 본인인지 확인
    manager.checkIdIsEqual(accountId);
    // 해당 유저 엔티티의 profile이 null이 아니면 해당 파일을 삭제하고, 새로운 프로필 사진을 업로드 할 것.

    // 1. 해당 유저 엔티티 갖고오기
    UserEntity foundUser = optional.getFoundUser(accountId);
    // 2. profile이 null인지 확인
    if (foundUser.getProfile() != null) {
        // null이 아니면 해당 url에 있는 사진객체를 삭제할 것
        s3FileService.deleteImage("/profile", foundUser.getProfile()
                .substring(foundUser.getProfile().lastIndexOf("/")+1,
                        foundUser.getProfile().length()-1));
    }

    // s3에 해당 프로필 사진 업로드 (단 한장만 가능!!)
    if (multipartFile.size() > 1) {
        throw new ResponseStatusException(HttpStatus.BAD_REQUEST, "프로필 사진은 한장만 업로드 가능");
    }
    List<String> uploadUrls =  s3FileService.uploadIntoS3("/profile", multipartFile);
    log.info("uploadUrl  "+uploadUrls.toString());

    foundUser.setProfile(uploadUrls.toString());
    userRepository.save(foundUser);
    return foundUser.getProfile();
}
코드를 쓰면서도 아니다 싶은 코드가 되어갔다.
그니까 String 형태의 Profile을 substring하는데..
또 List형태를 toString으로 저장한 것이기 때문에 앞 뒤에 [example.jpg] 이렇게 중괄호까지 같이 저장이 된다.
물론 프로필 사진은 한장만 올리기 때문에 어떻게든 해결 할 수 있지만,
중고물품과 쇼핑몰 제품 사진같은 경우에는 무조건 여러 장을 올려야 할 것!!
그렇게 되면 Item -> ItemImage 이렇게 1: N 관계로 새로 엔티티를 만들어야 함을 깨달았다.
중고물품 UsedGoods -> UsedGoodsImage 이것도 똑같이 1:N 관계의 엔티티가 필요하다.
그래서 새롭게 엔티티를 생성하여 해결!


9. List를 불러올 때 발생하는 NullPointerException
: 이미지 엔티티를 만들어주었고, 해당 중고물품에 대한 정보를 보여줄 때 올라온 상품 이미지 링크들이 함께 보이길 원했다.
1) NPE.
그런데, fromEntity()라는 엔티티를 DTO형식으로 바꿔주는 static factory method를 실행하면서 엔티티 자체에 list가 null이라는 문제가 발생했다. (ㅠㅠ)
    public static UsedGoodsDto fromEntity(UsedGoods entity) {
        List<UsedGoodsImageDto> dtoList = new ArrayList<>();
        dtoList = entity.getImageList().stream()
                .map(UsedGoodsImageDto::fromEntity)
                .collect(Collectors.toList());

        return UsedGoodsDto.builder()
                .title(entity.getTitle())
                .description(entity.getDescription())
                .minimumPrice(entity.getMinimumPrice())
                .imageUrls(dtoList)
                .saleStatus(entity.getSaleStatus())
                .seller(UserDto.fromEntity(entity.getSeller()))
                .build();
    }
널포인터가 제일로 답답하다 오류가 생겼을때....
나의 생각의 오류 첫번째는
UsedGoods에 ImageList를 빌드하지 않았다. 이유는 Image객체를 만들어야 하는데 아직 안만들었기 때문!! Image객체들을 만들고 나서, 어떻게 하면 되지 않나?라고 생각했다. 그러나 이것이 오류의 출발점이었다.
// 중고물품 업로드
public UsedGoodsDto uploadUsedGoods(List<MultipartFile> multipartFile, UsedGoodsDto dto) {
    // 1. 셀러 정보 인증정보에서 가져오기
    UserEntity seller = manager.loadUserFromAuth();

    // 2. seller정보와 dto를 가지고와서 새로운 UsedGoods 객체 생성
    UsedGoods newGoods = UsedGoods.builder()
            .title(dto.getTitle())
            .description(dto.getDescription())
            .minimumPrice(dto.getMinimumPrice())
            .saleStatus(SaleStatus.ON_SALE)
            .seller(seller) // 판매자는 저장은 하지만, 실제로 조회시에는 보이지 않아야한다.
            .build();
    newGoods = usedGoodsRepo.save(newGoods);

    // 3. S3에 이미지들을 업로드하고, 그 파일들이 저장된 url을 String으로 반환
    List<String> urls = s3FileService.uploadIntoS3("/usedgoods", multipartFile);
    // 4. 이 String List 하나하나 UsedGoodsImage 엔티티가 각각 생긴다.
    for (String url : urls) {
        UsedGoodsImage image = UsedGoodsImage.builder()
                .imgUrl(url)
                .build();
        imageRepo.save(image);
    }
    return UsedGoodsDto.fromEntity(newGoods);
}
빌드할 때 생성이 되는데,
필드에서 = new ArrayList<>(); 를 외쳐봐도...아무일 없다..
빌더패턴으로 생성할 때! 꼭 이건 null이 아니야!! 라고 이야기를 해주어야 한다.
일단 이것이 핵심!
    // 중고물품 업로드
    public UsedGoodsDto uploadUsedGoods(List<MultipartFile> multipartFile, UsedGoodsDto dto) {
        // 1. 셀러 정보 인증정보에서 가져오기
        UserEntity seller = manager.loadUserFromAuth();

        // 2. seller정보와 dto를 가지고와서 새로운 UsedGoods 객체 생성
        UsedGoods newGoods = UsedGoods.builder()
                .title(dto.getTitle())
                .description(dto.getDescription())
                .minimumPrice(dto.getMinimumPrice())
                .imageList(new ArrayList<>())
                .suggestionList(new ArrayList<>())
                .saleStatus(SaleStatus.ON_SALE)
                .seller(seller) // 판매자는 저장은 하지만, 실제로 조회시에는 보이지 않아야한다.
                .build();
        newGoods = usedGoodsRepo.save(newGoods);

        // 3. S3에 이미지들을 업로드하고, 그 파일들이 저장된 url을 String으로 반환
        List<String> urls = s3FileService.uploadIntoS3("/usedgoods", multipartFile);
        // 4. 이 String List 하나하나 UsedGoodsImage 엔티티가 각각 생긴다.
        for (String url : urls) {
            UsedGoodsImage image = UsedGoodsImage.builder()
                    .imgUrl(url)
                    .build();
            imageRepo.save(image);
        }
        return UsedGoodsDto.fromEntity(newGoods);
    }
요렇게 오류가 생기지 않고 나왔다! 하지만, 이미지를 업로드 했으나, 이미지 urlList는 결과값으로 나오지 않았다.
2) 두번째 오류 : NPE는 해결되었으나, List가 보이지 않는다
UsedGoods - UsedGoodsImage (N:1)의 관계로
양방향 맵핑을 해주었다.
@OneToMany - @ManyToOne
나의 두번째 생각의 오류는
UsedGoodsImage에서 빌드할때 imgUrl과 usedGoods객체를 활용해 빌드패턴으로 생성해주면?
즉시 이 둘의 관계가 생겨 UsedGoods에는 ImageList url을 입력해줄 필요가 없을 거라고 생각한 것.
그러나, 이렇게 되면 image쪽에서만 UsedGoods객체를 가져올 수가 있다.
근데 내가 UsedGoodsDto에서 불러오는것은 반대다. UsedGoods에서 imageUrlList를 가져오는것!
그러므로,,, 어느 한쪽의 엔티티 객체를 넣을때 두 쪽에다가 저장을 해주는 것이다.
이게 바로 연관관계 편의 메서드!!!!
더 자주 쓰는 쪽에다 만들어주면 된다
나는 image에다 넣어주었다.
package com.example.missiontshoppingmall.usedGoods.entity;

import com.example.missiontshoppingmall.BaseEntity;
import jakarta.persistence.CascadeType;
import jakarta.persistence.Entity;
import jakarta.persistence.FetchType;
import jakarta.persistence.ManyToOne;
import lombok.*;

@Entity
@Getter
@AllArgsConstructor
@Builder
@NoArgsConstructor
public class UsedGoodsImage extends BaseEntity {
    @Setter
    private String imgUrl;

    @ManyToOne
    @Setter
    private UsedGoods usedGoods;

    // 연관관계 편의 메서드
    public void addUsedGoods(UsedGoods ug) {
        this.setUsedGoods(ug);
        ug.getImageList().add(this);
    }
}
이미지를 넣어주면서 UsedGoods 객체를 인자로 해서 set해주는 것. 그리고, UsedGoods 객체 입장에서도 동일하게 ImageList()에다 해당 Image 객체를 추가해주는 것.
    // 중고물품 업로드
    public UsedGoodsDto uploadUsedGoods(List<MultipartFile> multipartFile, UsedGoodsDto dto) {
        // 1. 셀러 정보 인증정보에서 가져오기
        UserEntity seller = manager.loadUserFromAuth();

        // 2. seller정보와 dto를 가지고와서 새로운 UsedGoods 객체 생성
        UsedGoods newGoods = UsedGoods.builder()
                .title(dto.getTitle())
                .description(dto.getDescription())
                .minimumPrice(dto.getMinimumPrice())
                .imageList(new ArrayList<>())
                .saleStatus(SaleStatus.ON_SALE)
                .seller(seller) // 판매자는 저장은 하지만, 실제로 조회시에는 보이지 않아야한다.
                .build();
        newGoods = usedGoodsRepo.save(newGoods);

        // 3. S3에 이미지들을 업로드하고, 그 파일들이 저장된 url을 String으로 반환
        List<String> urls = s3FileService.uploadIntoS3("/usedgoods", multipartFile);
        // 4. 이 String List 하나하나 UsedGoodsImage 엔티티가 각각 생긴다.
        for (String url : urls) {
            UsedGoodsImage image = UsedGoodsImage.builder()
                    .imgUrl(url)
                    .build();
            // 여기서 연관관계 메서드 (이미지에 UsedGoods set하는 동시에 UsedGoods의 imageList에 추가해주기)
            image.addUsedGoods(newGoods);
            imageRepo.save(image);
        }

        return UsedGoodsDto.fromEntity(newGoods);
    }
그랬더니 imgUrl도 모두 나왔다!
10. 토스 페이먼츠에서 프론트와 백을 넘나들기
: 처음에는 아예 방향을 못잡았다. 여태 계속 포스트맨으로만 테스트를 하다보니, 토스 결제는 실제로 html 창이 있어야 테스트를 할 수 있는데, 이때 그러면 JSON 형태로 주고받고 하는 방법을 아예 몰라서 계속 헤맸다.
내가 구현한 방법
1) RestController가 아닌 그냥 Controller로 html에 대한 설정을 해준다. 그 html창에서 결제를 하는 것!
2) 결제를 구분하기 위해서 나는 orderId를 pathVariable로 넣어주었다. -> /payment/{orderId}로 이동해야 함.
어차피 주문하면 그 정보에 orderId가 나와있기 때문에 그걸 이용해서 브라우저에서 테스트 가능하다.
그리고, 여기서 redirectAttributes로 orderId, orderItemName, amount를 넘겨주었다.
@Controller
@Slf4j
@RequiredArgsConstructor
public class PaymentController {
    private final EntityFromOptional optional;

    // 결제요청 html로 이동하는
    @GetMapping("/payment/{orderId}")
    public String requestPayment(
            @PathVariable("orderId") Long orderId,
            RedirectAttributes redirectAttributes
    ) {
        // redirectAttributes로 order에 대한 정보 함께 전달.
        ItemOrder foundOrder = optional.gerOrder(orderId);
        // 만약 not paid상태가 아니면 예외처리
        if (!foundOrder.getPaymentStatus().equals(PaymentStatus.NOT_PAID)) {
            log.info("지불이 불가능한 주문입니다.");
            throw new ResponseStatusException(HttpStatus.BAD_REQUEST);
        }
        redirectAttributes.addAttribute("orderItem", foundOrder.getOrderItem().getName());
        redirectAttributes.addAttribute("amount", foundOrder.getTotalPrice());
        redirectAttributes.addAttribute("orderId", orderId);
        return "redirect:/static/payment.html";
    }
}
3) 브라우저에서 결제하기 누르고 사용자가 결제를 하면 여기서 결제 요청을 가는데, 여기서
결제 요청할 때 orderName에다가 넘겨서.... 넣어주었다.
<script>
// 만약 Bearer Token만으로 인증을 하게되면 결제하려는 상품이 여러개일 경우에는 구분하기 어려울 것
// 같다고 생각했다. 그래서 그냥 url로 orderId 자체를 넘겨서 해결하려고 했다.
// todo: 고민인 것은 orderId, amount, orderItem이 url로 노출되어도 괜찮을까?
// 현재 내 관념에서는 괜찮을 것 같아서 사용하였다.

    // url에서 값을 얻어서 변수로 지정
    const urlParams = new URLSearchParams(window.location.search);
    const itemOrderId = urlParams.get('orderId');
    const amount = urlParams.get('amount');
    const orderItem = urlParams.get('orderItem');

    // 구매자의 고유 아이디를 불러와 customerKey로 설정
    const clientKey = '  '

    // 결제 위젯, 결제 방법 위젯
    const paymentWidget = PaymentWidget(clientKey, PaymentWidget.ANONYMOUS)
    const paymentMethodsWidget = paymentWidget.renderPaymentMethods(
        '#payment-method',
        {
            value: 0,
            currency: 'KRW',
            country: 'KR',
        },
        { variantKey: 'widgetA'}
    )
    //결제 서비스 이용약관 동의
    const paymentAgreement = paymentWidget.renderAgreement(
        '#agreement',
        { variantKey: 'AGREEMENT' }
    )

    //여기서 실제 결제 가격으로 update!!
    paymentMethodsWidget.updateAmount(amount);

    // 결제 요청
    const paymentRequestButton = document.getElementById('payment-request-button');
    paymentRequestButton.addEventListener('click', () => {
        try {
            paymentWidget.requestPayment({
                orderId: crypto.randomUUID().replaceAll('-', ''), // orderId는 이거고요,,
                orderName: `${itemOrderId}-${orderItem}`, // orderName은 이걸로 정해줌.
            }).then(async data => {
                const response = await fetch('/shopping-malls/order/{orderId}/payment', {
                    method: 'post',
                    headers: {
                        'Content-Type': 'application/json',
                    },
                    body: JSON.stringify({
                        paymentKey: data.paymentKey,
                        orderId: data.orderId,
                        amount: data.amount,
                    }),
                })
                if (response.ok) {
                    console.log(data.paymentKey);
                    location.pathname = '/static/success.html'
                }
            });
        } catch (err) {
            if (err.code == 'USER_CANCEL') {
                alert('사용자 결제 취소')
            }
            else alert(err);
        }
    });
4) 이후 TossController toss/confirm-payment에서 쭈루룩 진행된 것들이 다시 서비스단으로 돌아와, 결제 승인 요청시 service단에서 상품 재고가 갱신되고, paymentKey를 저장해주고, 결제상태를 업데이트 해주었다.
// OrderService class
	// 결제 승인 요청 보내기
    public OrderResponse confirmPayment(PaymentConfirmDto dto) {
        // HTTP 요청 보냄
        HashMap<String, Object> tossPaymentObj = tossService.confirmPayment(dto);
        log.info("tossPaymentObj :: " + tossPaymentObj.toString());

        String itemOrderId = tossPaymentObj.get("orderName").toString().split("-")[0];
        // orderId로 Order 객체 찾아내기
        ItemOrder foundOrder = optional.gerOrder(Long.parseLong(itemOrderId));
        // 결제 성공시 재고가 갱신되어야 한다.
        Integer stockNow = foundOrder.getOrderItem().getStock(); // 현재재고
        foundOrder.getOrderItem().setStock(stockNow-foundOrder.getAmount()); // 재고 갱신.
        foundOrder.setPaymentStatus(PaymentStatus.PAID);
        foundOrder.setPaymentKey(tossPaymentObj.get("paymentKey").toString()); // 아직은 transaction완료가 아님.

        foundOrder = orderRepo.save(foundOrder);
        return OrderResponse.fromEntity(foundOrder);
    }
이렇게 paymentKey가 저장되면서 해결 완료!!~~
'Project > shoppingmall project' 카테고리의 다른 글
| [리팩토링] 예외 처리와 계층분리/책임분리 (1) | 2025.01.04 |
|---|---|
| 쇼핑몰 프로젝트 회고 (0) | 2024.03.05 |
| Spring Security + JWT 이해하며 구현하기 (0) | 2024.03.05 |
| 쇼핑몰 프로젝트 (0) | 2024.02.22 |